When I was 10 I saw Who Framed Roger Rabbit in the cinema... five times! To say it had an effect on me is a bit of an understatement. It was at the very moment when Roger walked off the cartoon set and into the real world that I knew what I wanted to spend my life doing; being an animator for feature films.
Since then it has been a long and wonderful journey of working at Disney Consumer Products, running my own animation company developing TV shows for with Cartoon Network and Nickelodeon and then attending the online school, Animation Mentor (which I believe is hands down the best place to learn animation anywhere).
It was at Animation Mentor that I was lucky enough to be taught by some of the greats currently working in feature animation today. Passionate teachers like Sean Sexton at DreamWorks, Victor Navone at Pixar and Drew Adams at DreamWorks who added even more desire fuel to achieve my goals!
More recently a film had the same effect on me that Roger Rabbit had all those years ago, How To Train Your Dragon. When Hiccup rises up into the clouds on the back of Toothless I knew where I had to apply this craft that I had been working so hard to learn, at DreamWorks.
But I never imagined the amazing mentors and friends that I would make at Animation Mentor. These incredible people included Sean Sexton, Drew Adams, David Weatherly, Ron Pucherelli and Simon Otto. It was through their belief and support in me that I was able to get an interview with DreamWorks and I will be forever grateful.
The interview process was intimidating and extremely exciting. It was also very fitting that my first interview was with James Baxter - an animation god who just so happened to work on Who Framed Roger Rabbit!
I leave Australia on July 2nd to move to LA and will start working at a studio that to me is best described in the words from the wonderful movie, Hugo: "If you've ever wondered where your dreams come from when you go to sleep at night, just look around. This is where they are made."
Video reference has always been a very important part of the animation process and has become much more of an understood tool with people like Jeff Garbor and his great reference for Blue Sky's Horton Hears A Who and Ice Age. Interestingly, it is something that has not really been spoken about or seen in the same light in relation to 2D animation.
But i think with further research and understanding, the way in which video reference was often used by Disney in the old days is very similar to how it can be used today in 2D or CGI animation.
(Once again, please remember I am also just an animation student and I am still learning like you. These are just things I have found that have worked for me and I am sure there are many other great ways of working.)
The first person to make use of and come up with the idea to use video reference for animation was Art Babbitt. In the mid-1930's, Babbitt was working at the Walt Disney Studio on the original lot in Hyperion Avenue (which is unfortunately now a parking lot for a grocery store!). These guys were creating an art form and where pushing each other to constantly improve. This included Babbitt bringing in an art teacher (more on that in a future post) and purchasing a 16mm camera for him to shoot film reference to study movement.
Frank Thomas and Art Babbitt talking about video reference.
Often at Disney comedians, vaudeville actors, and the voice actors themselves where shot on a stage in costume for the animators reference (Cinderella was the first Disney feature where the whole film was shot in live action prior to animation). However, when the frames of the reference was traced, the resulting animation was lacking in life and felt flat (which is the same result you get when importing the video reference into a CG package and positioning the character over the reference).
Snow White Video Reference
But the animators found it extremely helpful in coming up with different or unique acting choices, understanding how difficult shapes turn in space, costume follow through and overlap and to study the body mechanics.
I love these two clips from Alice In Wonderland which show the comparison between the live action reference footage and the final animation. This really made me understand how I could best use video reference. You can see in the first clip (at 20 seconds) where the animator has found great inspiration in how the foot drags along the floor, the hands coming up and then dropping to her lap in frustration and the little head shake. But you can also see where they have pushed the poses, made the hands clearer as she holds them up before dropping them back into her lap and how the timing and spacing is different to get more spark and life.
This second clip from the mad hatter tea party is fantastic (they actually ended up using the audio recorded from this session for the film as it was better than when they got the actors back in to record it in the booth). Its also great to see animators like Freddie Moore and Ward Kimball working away on set.
Another great clip of reference is from Sleeping Beauty with Marc Davis and Milt Kahl drawing at the boards and doing studies of the hands, poses and dress movements of the actress.
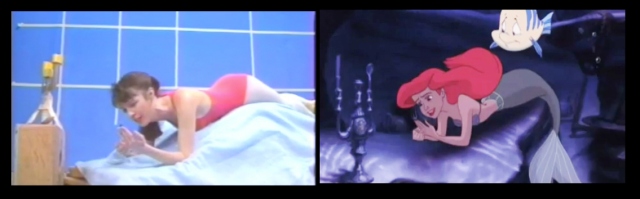
Video reference continued to be used in the more recent Disney 2D features including The Little Mermaid. This clip shows Glen Keane directing an actress on what he wants and he talks about what he was able to utilise from the reference in his Ariel scenes.
This is a process I have found really helpful in my animation where I shoot video reference (sometimes of myself, and sometimes of a person I know that I think has qualities similar to the character I want to create). I then go through the following steps:
• I take screen grabs from the reference of the keys where there accents in the dialogue, changes in emotion, contacts and changes in direction in the movements.
• I draw out these key poses and really try to push them. I find the line of action and go further. I tilt the head more, I push the shoulders etc. I usually do quite a few drawings of each pose and simplify and exaggerate the pose until it is as clear as possible.
• I then use the drawings as my reference in Maya to pose out my animation.
Lots more to come in the coming days with some very cool Disney pencil tests.
Based on my last two posts about the brows and mouth, I wanted to talk about tying it all together and getting the face to feel more fleshy and the parts all working together.
Getting it too all work together:
Something that really stands out to me in Disney 2D animation is how well the facial expressions are designed so that all the parts work together. When I first started dialogue shots at Animation Mentor, I found in my own animation there seemed to be a tendency for the top and bottom halves of the face to feel quite separate.
So I asked one of my mentors about this, and he said; "Make sure you get the entire face involved". What I found that meant was that all the muscles in the face are connected and when you make an expression on your own face, or on your character, all the parts are effected by each other.
I recently bought a little camera that allows me to shoot slow motion video up to 1000 frames per second. The quality is really low at that speed (and its too slow anyway for facial stuff), but at 240fps it looks great. I recorded a line of dialogue with me acting out the words so that you can see how much is going on in the face and will be the basis of what I am talking about (don't laugh at me!)
Slow Motion Video Reference at 240fps
So this is how I have been trying to get that feeling more into my work. Remember, I am still just learning this stuff too and I am sure there are many other ways to do this. None of these things are rules, but just things that I have found has worked for me along the way.
The brows and upper eyelids:
When the brows press down or stretch up they seem to have an effect on the upper eyelid. This eyelid is pushed and pulled into shapes by the brow.
This however does not mean that the eyelids must always follow the brow, quite often they can lead the action prior to the brows movement.
The mouth corners and cheeks and bottom eyelids:
As the mouth corner raise in a smile the cheeks also push up under the eyes. The same happens when the mouth corners drop, the cheeks drop too. In CG animation I have found you can copy this animation from the corners the cheeks and scale it down to make sure they are related (and some instances delay it by a frame too).
When the cheeks raise and lower the seem to push and pull the bottom eyelid as well. In a big smile the bottom eyelids would push up and the same in a big scream the cheeks pulling down would also pull on the bottom lids.
The jaw and nose:
As the jaw opens and closes it also seems to pull and push up on the nose. Go on, try it! No one is watching. Hold your finger against your nose and open you mouth and you will feel the nose pulling down.
All of these things combined can really make you facial animation feel much more fleshy. Have the skin being pushed and pulled, squashed and stretched and making sure these elements are all effecting each other really makes it all feel tied together.
A great example of all of this working in animation can be seen in the Disney film, 'Tangled' (I know, I keep showing it, but damn, the animation is so good!) This shot is of Mother Gothel:
The Eye and Mouth Zipper AKA Making them Sticky:
When watching a lot of live action and animated footage frame-by-frame something that really stands out is how the eyelids and mouth seem to be naturally sticky. Once they are closed together they seem to want to stay that way so that when they opening it feels like you have to really pull them open.
I know some CG rigs have an eyelid or mouth zipper control, but unfortunately on Bishop from Animation Mentor it does not and we have to do it manually. (Which actually helps when learning how this effect works - so its a good thing!)
Eyes:
As the eye opens, one section is chosen to pull open first. The lids lift up and then one part pops open before the rest following in a zip like action. Take a look at this great example from Ratatouille:
Mouth:
The same thing happens with the mouth. Usually it is the middle section of the mouth that pops open first and then is followed by the outside edges. But if someone is talking out of a certain side of their mouth you can open the edge first as well.
There is an extra part of the mouth and eye pulling action that also needs to be explained. The lids and lips need to feel like they are stretching and pulling prior to unzipping. In the mouth this is done by pulling the jaw open, but keeping the lips closed and having the corners and lips pull down as seen in the diagrams above.
Head Squash and Stretch:
Finally, something that I think really helps to make all of this tie together again is a small amount of head squash and stretch. Some rigs allow the top and bottom parts of the face to be handled separately, but even with rigs like Bishop a global squash or stretch can add a lot too.
These Preston Blair drawings from the book 'Advanced Animation' really explain this well:
To continue on from last week with the discussion about brows I wanted to move onto the next most expressive part of the face, the mouth. We first look at the eyes for attitude, but the mouth should complement the eyes and work with the rest of the pose. It has so much that can add to the expression and help convey so much character and personality.
(Remember, these are just things that have worked for me and not hard and fast rules. I am sure there are many other things that work too and lots of other things for me to still learn!)
For me, two things really stand out when I think about the mouth; Appealing Design and Specific Shapes.
Appealing Design:
Appeal is such a elusive thing to obtain, but for me it is one of the most important elements in animation. You know when you get it right because it looks so good that you just can't look away from it!
Animation wise, a film that I think oozes appeal is Disney's Tangled. Glen Keane and Jin Kim did so much amazing development work and design which I think really helped create some of the most appealing CG characters to date.
These drawings are by Jin Kim for the Mother Gothel character in Tangled. The mouth shapes are really great and are so appealing to look at.
I know that during the production of The Incredibles at Pixar, they look a lot at Disney's 101 Dalmatians for great mouth designs and lip shapes. This model sheet by Milt Kahl of Jasper is fantastic. It has tons of character and all the shapes have so much squash and stretch and fleshiness to them.
I really like Shane Prigmore's model sheet for Coraline too. The mouth shapes have loads of asymmetry to them.
When designing mouth shapes I am looking for straights against curves, for squash and stretch, for asymmetry, for simplicity in the curves (even though complex mouth shapes can and should be used, its keeping the lines simple that makes it much easier to read) and knowing when to favour the upper or lower teeth.
In CG, mouth shapes and quickly become really ugly. Sometimes this a problem of the model and how the rigging and shapes have been developed, but a lot of times it is also trying to over complicate the mouth or push it into poses that are trying to match real life ie. rotoscope it too closely rather than caricature it and reduce it to the essence of the design.
Specific Shapes:
Everyone talks and moves their mouths in completely unqiue way, and the mouth should be unique to the character that you are working on. At Animation Mentor we are given a library of mouth shapes to work with on the character, Bishop. My advice which is the same advice from my mentors at Animation Mentor is; don't use it!
The library is default/stock and completely lacks character. In many cartoons the same few mouth shapes are used over and over. This is the same with the library, it looks robotic and formulaic. The mouth shapes need to be designed for every dialogue scene based on who the character is, and how he or she is feeling at that moment.
Just take a look at any great film or watch yourself in your video reference and you will be amazed at the crazy shapes! Designing good and appealing shapes is hard, but loads of fun too and it adds so much to the character and personality of the scene. A hick might talk out the side of his mouth, an angry woman might pout, a tough guy might talk through his teeth with very little lip roll.
A character that is loads of fun to watch for expression and mouth shapes is Peter Lorre (he also has an awesome voice!) Just take a look at these great mouth shapes! This is all from The Maltese Falcon (I am planning on animating a shot from it very soon).
I really liked this one of Burl Ives. I did a shot with a kindly santa elf and watched a fair bit of Burl Ives for inspiration of the mouth shapes for that piece of animation.
This is great too - Robert Ryan talking out the side of his mouth!
Wow! Look at this for crazy:
A movie a love to watch for really specific expressions and mouth shapes is The Odd Couple with Walter Matthau and Jack Lemmon (two of my favourite actors).
I really love watching the brows on people in both live action movies and in animation. One of my mentors at the online animation school, Animation Mentor described them as the shoulders of the face. Its something that have been much more aware off when doing my planning for a shot. I will do an additional video where I don't worry about the lip sync and just act out the lines in my brows and eyes.
There are 2 films that really stand out to me when I think about great brow animation; Ratatouille (which I think is still one of the most well animated CG films ever made) and more recently with Puss in Boots (which blows my mind animation wise as well), especially the Humpty character as he is all head!
I try to approach the design of my brow shapes based on them being one of 2 categories, Voluntary or Involuntary expressions:
A) Voluntary expressions: This is an expression where the character is choosing to make that expression like when you are judging someone or have a questioning look on your face. They tend to be more complex in shape and are more asymmetrical. They are more controlled in movement and timing wise can be over more frames.
B) Involuntary expressions: Expressions like surprise and disgust that you don't have control over. They tend to be simpler in shape and are more symmetrical. These expressions are faster time wise and sharper in their movement.
Generally though, the shape change is quite fast - brow movements tend to be much sharper than other body parts. They almost always lead the movement of the head/body parts. This way, you will read the change because if it is during the body or head move you will miss it and it also makes the character look like he or she is thinking.
Ratatouille
In Pixar's Ratatouille the character Anton Ego really stands out to me for facial animation. He is very reserved in his body movements with tight gestures of the hands and small body weight shifts. However you think of him as quite a cartoony character in that his facial animation is very broad.
This shot of Anton Ego has 6 main brow shapes or "ideas" as seen in the images below. They don't change constantly, but are kept alive and are involved throughout the acting by flexing or squashing within the current shape. This way they keep moving, but they don't change so much that they complicate the performance.
I really like in the first few eyes darts and how the brows support these movements. When he looks left, the outer and middle parts of the brow drop a little as the pupil moves away from the screen right part of the eye.
I love the transition between frames 236 and 249 where not only do you have the brows leading the body/head move, but the inner brows are leading the outer part of the brow movements. So you get that lead and follow. Normally you would not want to do that any more than 1 frame.
But what I like so much about this transition is that rather than going from pose A to pose B there is a breakdown in there. This gives it a bit more overlap and arcing shape in the movement as well. If you had of just gone from pose A to B without the breakdown it would have felt like the the brows were just rotating.
So its important to add breakdowns in the bigger brow shape changes just like you would in a body or head movement.
To finish off the move it has a really nice overshoot and then settles back down into a shape that is not as intense as the overshoot with an ease in which works well as that ease in is there to really as an effect to scare the guy. So its quite a controlled movement.
Puss In Boots
I love this shot for two reasons - the facial animation on Humpty is amazing and.... its got the "ooooooh" cat! Haha!
The brows in this shot are used so well to really support the other movements in the face and too get the sadness and internal struggle across with the little twitches and changes.
Like the Anton Ego shot where his eye darts where supported by small shifts in the brow shape, at the start of this shot Humpty blinks and there is a small compression in the brows to show the skin pulling down over the eyes which really keeps everything connected and adds to that fleshy feel.
At frame 26 you can see the inner brows leading the body movement and expression change where they go down first. The brows then tense up and move down even further at 39 to really help sell that face compression with the mouth and cheeks.
I love the little staggered drops between frames 63 and 80. Adds some texture to the movement, but also helps to show that internal thinking and struggle going on inside the character.
The brows lead again going up at 81 before the head. They lead by 2 frames here before the head comes up on 83-84.
All the little twitches and movements at the end are great as well. He is starting to break down and has a really nice involuntary feel to it.
Anyway... hope this all makes sense! Let me know if you have any questions. And remember, this is just stuff I have observed and found that has worked for me when animating, but I am sure there are many other great ways to do all of these things too.
In the 1930’s Don Graham held a class after hours for the staff at Disney, which were called, Action Analysis Class. These classes are one of the many reasons why huge leaps in innovation and art were made at Disney. Never content to remain static in their understanding and knowledge of what makes animation great, these artists would constantly study acting, body mechanics and drawing to improve their work.
But they would not stop there. They would also analyse why some of their pictures where successful and others not as much with audiences. What worked in a scene and how the artists achieved it so that the rest of the studio could employ that technique moving forward.
Recently I graduated from Animation Mentor; an online animation school where one of the many elements that make it so successful is the community spirit of learning. There is no feeling of guarded secrets. Everyone helps and shares what they learn as they go along.
Now that I have finished the Animation Mentor course, I wanted to start a blog that continues in that tradition. A place where I can post anything that inspires me including short films, art, other student work and tips and tricks.
The tips and tricks however are something that must never be taken as gospel. I am still a student in animation and I certainly don’t profess to hold the final answer (and I constantly keep learning the rules are there to be learnt, bent or even broken). These are just personal observations and things that have worked (or not worked for me) along my journey of animation education.
Please feel free though to take part in this blog. Email me or post your comments to help the discussion further of any of the posts. Or, if you have a clip, drawing or tip to share on the site – please email me now at: